Tutorial 3
Hello!
Booooy has it been a while! A lot has changed everywhere! Are you doing more sewing at home? I hope so!
Would you like to add listings to the Vintage Patterns Wiki? A lot has changed there, too! My previous tutorials are less than helpful these days. So I thought I would write you a new one!
Here's my previous ones: (Note: They are not entirely accurate now but may still be useful)
* Adding Links to the Vintage Pattern Wiki (Part 1)
* Adding Patterns to the Vintage Pattern Wiki (Part 2)
While adding links is more or less the same (I'll go over what's changed), adding patterns is a LOT different. It's become more labor intensive, but it is really NOT very much more complicated. This is going to be a LONG tutorial, but I'm sure you can get something out of it.
First things first: This is written for people using the CHROME browser in WINDOWS on a PC. I don't know if it will work the same in every other browser, or with other operating systems. I do not recommend using a phone or a tablet to do this. I recommend you use a PC.
I DON'T RECOMMEND THIS FOR COMPLETE COMPUTER BEGINNERS. If this looks too scary for you, well, I still believe you can do it, but maybe practice a little first. :) If you have used and made edits to the Wiki before, you can probably do this no problem.
The first step is to make sure the pattern you want to add isn't already in the wiki. If it is, well, you don't need to add it! Let's go over again how to do that.
In some cases, that won't be the pattern you're looking for... in that case add "underscore A," "underscore B," etc., until you find the one you're looking for. If you don't find the one you're looking for, you have to add it! In this case, I'm looking for a 1920s Butterick pattern. When you're ready to add, click "create this page."
MEANWHILE, in another tab, open a pattern wiki page that already exists. It doesn't matter what it's called or what page it is, just so long as the formatting is correct. We're going to use this to transfer the format over to our listing. DON'T CLOSE THE TAB of the page you're creating.
Again, we're just going to use a previously-published pattern to use the formatting for a new listing. So, it doesn't matter which listing it is... we just need the formatting since the old way of using a template is gone. We're basically making our own template.
On this page, click the purple arrow on the right. Click "EDIT SOURCE"
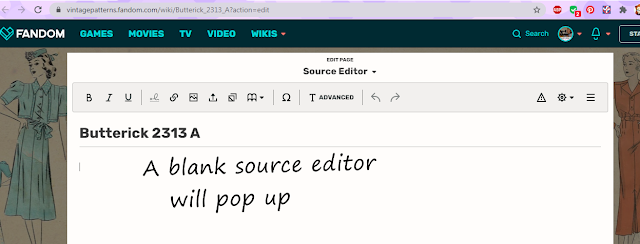
Edit source is here!
When you open that page, RIGHT CLICK anywhere where the text is. Then click "SELECT ALL."
Now, while everything is highlighted, right click again and select "COPY." (Note: You can also type "Ctl+C.")
This is very VERY important. HIT CANCEL. DO NOT SAVE. HIT CANCEL.
Now, switch back over to the "create listing" tab you started earlier. You're going to paste in the information from the listing you just copied.
In the blank listing you have started, right click, and click "PASTE."
(Note: You can also type "Ctl-V.") This will paste in that information from the other listing.
Now, you have to remove what you don't need. You want to keep the formatting, but get rid of all the information about the other pattern. Keep headings and stuff that is the same in every listing. Delete everything else. Delete other vendors, links to blogs, etc. But MAKE SURE you keep those category headings.
For example
Delete this stuff. We'll add categories back later. (Again, DON'T delete headings and important stuff.)
Next, the first thing you want to do is add your picture. Assuming you have taken a picture or scanned one in of the pattern you want to add. Put your cursor in the spot indicated in the picture, and click the little button that looks like a picture.
When you click, a pop-up occurs. Don't freak out!
The pop up will ask you if you want to use a picture that's already been uploaded. This is pretty annoying, since you probably don't want to do that! Ignore those pictures and click "Upload."
(Note: If your pattern already exists (which you should have already checked,) the picture might be there. Make SURE the pattern isn't already in the Wiki.
Another box will pop up. Agree to the terms by clicking on the box, and then click "Select File." Pick the picture of the pattern you want to add. Or, you can drag it to the grey box, either way.
After you do that, ANOTHER screen will pop up. Put in a brief description... (it can be as simple as the name of the pattern,) and then click "SAVE."
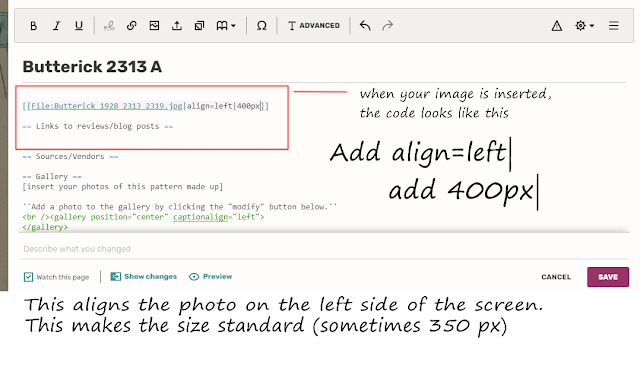
Now, yet another window will pop up. It should show the image you just uploaded. Click "USE THIS IMAGE."
This tells the code where to put the image (on the left side of the page) and how big it should be (400 pixels.) If you don't do this, the default is all wrong and will mess up the listing.
Now you want to add your pattern's description. One space under the picture code, but above "links to reviews/blog posts," write the description of your pattern.
The usual format is "name of pattern (semicolon) ca. date of pattern (semicolon) title of pattern (period) pattern description."
If you're confused, just look at other listings or the picture above about how writing the description works.
The format is "(two left brackets) Category (colon) Name of category (two right brackets)"
Click on "Edit Source" next to "Sources/Vendors."Look at the picture above. When you start to type a category, it should pop up and you can just click it and it'll finish the category entry for you. Add as many categories as you want. You can always add more after you publish the listing. (*Or Tarna will often add more for you.)
When you've added all the categories you want, your listing is more or less done! We want to check it to make sure nothing looks wrong. Click "preview" and you can make sure it looks ok before you publish it. If you just want to give up (I hope you don't!) click "Cancel."
It'll pop up a window of the way your entry looks. If it looks good, great! You can click "Save Changes." If something looks wrong, click "Resume Editing" and you can fix it.
Then your listing is officially published! YOU DID IT!
--------------------------------------------------------------------------------------
NOW. I bet you're wondering how to add your shop to the listing. This part is easy. You can do it on a listing you made, or any listing in the Wiki that's already there.
This is MUCH easier.
If there's other shops already listed, make sure you put yours last.
The format is listed above. "*[[Your shop link your shop name]]"
You can preview to make sure it looks okay, or click "save."
And that's it!
=======================================================================
I hope you found this helpful. If you have any questions, please feel free to drop them in the comments. Please visit all the Pattern Patter Team shops by searching "PPTP" or "Pattern Patter Team" on Etsy.


